"EXCEPT THE LORD BUILD THE HOUSE, THEY LABOR IN VAIN THAT BUILD IT"......Ps.127:1a
Showing posts with label furniture. Show all posts

Sunday, August 21, 2016

My New Primitive Hutch! Project #1

Finally, we are moved into our new home!
We have been painting and fixing and painting some more.  The first thing I had to do was paint my kitchen cabinets.  I will need to post about them another time though.  Hubby was painting the living room and dining room while I worked on the cabinets.  I did not want to unpack anything unless the place that the item was going to be stored was painted and ready to accommodate them.  So in between cabinets and wall painting, I decided to work on my hutch. 
I bought this pine hutch at a consignment shop.  It is not old and was not primitive enough for me. The person that built it did not sand the edges.  Every edge was sharp and perfect.  I don't necessarily like perfect in my decor :)  The doors are also too country looking and not primitive.  I needed to change that too.
 The first thing I did was to take off the doors and tear off the "T" shape center piece.  In doing so, I gouged the top frame....oops...but wait, that will make it look more rustic and used.
 I had a white shelf top that I used as my new door frame.
Here it is sanded down and ready to take in some stain.
 I painted the hutch (right over the sanded red paint) in Benjamin Moore's Carter Gray.  I absolutely love that color!  You will see more of that color in my future projects.  I just added a layer of Walnut stain over that counter top, but other than that the stained part of the hutch stayed the same.  You can also see in the top right photo that I did not paint all the way to the edge of the center frame board.  This gives it that worn and aged look without sanding.
I finished it with Minwax's Dark Walnut (my favorite).
As you see, I made two new doors that go all the way to the bottom edge of the hutch frame.  To me this looks more primitive.  I also changed the hardware and painted and stained them too.
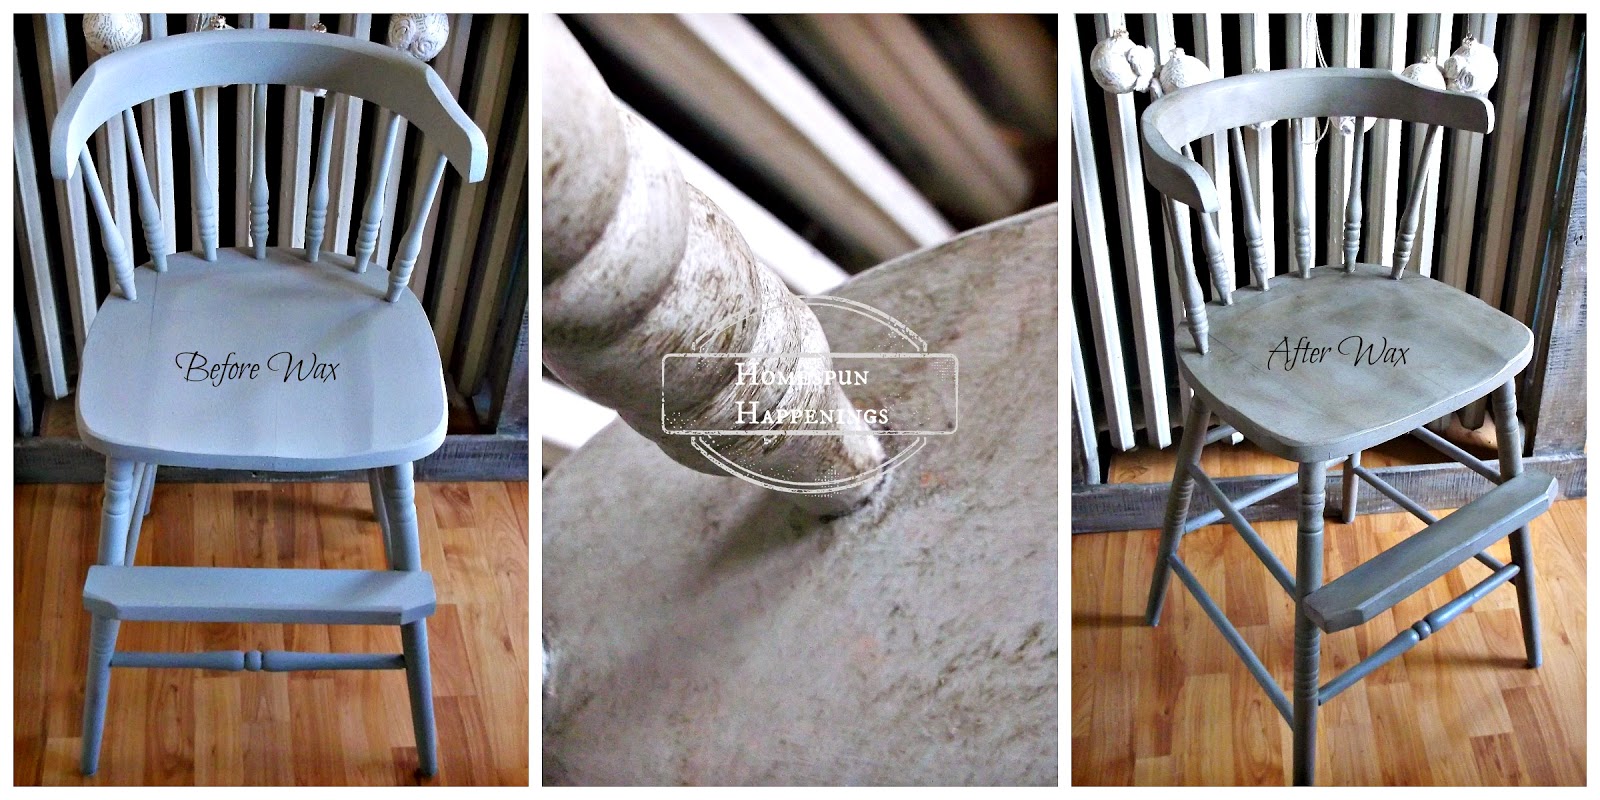
Here is a before and after.
What do you think?
It feels so good to be doing projects again!
Happy Sunday to you all!

Linking up with:

Tuesday, October 27, 2015

Salvaging a Display Shelf

Every year I wonder how I am going to display my crafts for my open house.  If I have a cabinet, it usually ends up selling before my sale ends.  I was thrilled when hubby told me there was a shelving unit,out for trash, I might want .  When he brought it home, I was less thrilled.  The whole bottom was molded.  I instantly thought, "He took the time to go get this thing, you are going to salvage it!".  I asked hubby to cut the bottom completely off, and please help me build a bottom out of scrap and pallet wood.
Here it is.

I painted the whole thing in Annie Sloans' Old White to match my other display pieces for my Craft Sale.  If you notice, the shelves have a hole in them.  They get Plexiglas laid inside them. 
Well, the Plexiglas was all scratched up, so I wanted to cover them.  I decided to glue brown paper over them.  I am not thrilled with it, but it is just a display piece and will be covered.  I did not want to waste anymore paint on this thing so....
...here is the final product!
Nothing fancy, but will work perfect for me.
After all, it was FREE!

Saturday, December 6, 2014

Cute Find

My hubby found this cute child's high chair along side the road.
I took a quick pic of it before I really got into painting it.
I used Annie Sloan's French Linen.  
I just love not having to sand pieces before painting.  I also like waxing, because it doesn't take forever and a day to dry (unless you are working in warm or muggy temperatures...winter time is perfect)
Such a cute chair!
I personally love the primitive look that the clear/dark wax gives.
It sold!

Wednesday, October 9, 2013

Giving a Drop Leaf Table New Life

My cousin and his wife are such sweet people.  He knows my addiction love for refinishing things.  He gave me this table.  I knew it had such great potential.  It had tons of scratches all over it and some lovely purple nail polish.
I sanded the top, and the sanding went fairly easy.  I didn't get all of the scratches off, but I tried to get any names or initials that were carved into it off the table.
I removed the leaves to stain  the top.
I stained it with 2 coats of Minwax's Dark Walnut stain.
I painted the bottom part in Annie Sloans Old White.  I love chalk paint.  It took two coats and I hardly used up any paint.  Since I wanted it to look like an old farm table, I distressed it using clear and dark wax.  I did not distress it using sand paper, because I did not want the honey color coming through.
Here is a before and after pic.
I love how the scratches in the wood give it an old feel.
I finished the top using a product called Waterlox satin finish. It is recommended to be used on surfaces that will be used for food.  I also used Waterlox on my countertop, and it really has strengthened the pine wood.  I still need to do one more coat, but I couldn't wait to share it with you all.
I am going to try and sell this at my craft sale in November.

Linking Up With:

Wednesday, October 2, 2013

Tall Prim Cabinet

My mind would not settle until I made this cabinet.  Sometimes that can be so annoying.  I wanted to build a tall cabinet out of the leftover porch wood and pallets.  I had envisioned it much wider, but I did not have enough of the right kind of wood for the top and the base. I started off making the door and gathered wood for the frame.
I built the sides alternating thin and wide boards.  I like the look of it not being uniform.  Before I painted it, the cabinet looked like a Big Top Tent.
I tried to make sure the shelves would be level, but I ended up doing this all over when the cabinet was finished. :)
I decided to use up my old kitchen cabinet paint. Rustic Cedar was the color. It is oil based.  Have I told you how spoiled I am from using chalk paint.  I never want to use oil again.  It took forever to dry!  Here is a pic of the color before and after stain.  The dark walnut stain made it a barn red color.
I had my oldest son whittle a piece of wood for my lock.
I reused some hinges I took off of something.
This picture makes the color of the cabinet look orange...It is NOT orange looking.
Here it is 4'5" tall and 20.25" wide
I know these are bad pics.  It was a cloudy day, and my camera did not want to focus right.  I wanted to use natural lighting so the color looked natural.  Oh well.....
What was so great about making this cabinet is that I was able to make it without buying a single item...just my time.

Linking Up with:

Knick Of Time

Fluster Buster

Wednesday, September 18, 2013

Making a Cabinet from Recycled Wood

Yay!  I finally finished building the cabinet!
It started off as a roadside find.  It was a double wall cabinet, and boy was it heavy!  It had no back to it.  The shelves were all cut up so that it fit flush on the wall.
So I tore it apart and saved some of the wood.  I then tried to get rid of the silver paint that was on it and loved how the white looked crackled with the silver.
Finally I took some pallet wood, porch wood, the door, the frame, and some wood from the old cabinet, and I built a single rustic cabinet.  My son helped me cut the wood that needed to be cut with the skill saw.
I used the porch boards for the sides and the pallet wood for the back.
I just wanted one shelf so that tall things could be stored inside the cabinet.  I stained the shelf holder to blend in with the pallet wood and porch wood.  For the shelf I glued two pallet boards together.
The door didn't close right so I needed to use a hand plane on it, but I don't own a plane.  My youngest reminded me how his grandpa lost his hand plane in the attic steps when he was remodeling our attic a few years ago.  I figured, why not rip up the step and see if it's there. 
It was!
( So Fran, I have your plane :) I don't know why we didn't do that when you were here instead of buying a new one)
I painted the top, sides, and back in white.  It needed to be stained in order to blend.
This is before I stained the whole cabinet.
Here is what is looks like stained.
I love how aged the stain makes it look.

Here it is finished.  
I have another door and more wood.  I think I might make another one :)
My plan is to sell it at my craft sale.  
Here is a question for all you ladies out there that have booths.
How much would you sell my cabinet?  
Everyone says I sell my things too cheap.


Thursday, August 15, 2013

What a Find!

We have not yet started school this year, which is late for me.  I have yet to purchase all of the school books.  I hope to do this Monday and hopefully start school at the beginning of September.  The kiddos are loving it.  I am loving this fall-like weather we have had for the past two weeks.  I am trying to get a jump on some of my roadside finds.  
I found this end table recently.  This is a pic of it after I cleaned it and my son sanded it.  I actually had started to stain the top when I took this pic.
End tables like these sell at our Amish markets for no less than $125.00.
I stained the top with dark walnut.  I also used Clear and Jacobean wax on the top.
I painted the bottom in Annie Sloan's French Linen and then waxed it with clear and dark wax.
This one is a keeper.  It is going in hubby's office.  
He also wants me to paint the other wing chair in French Linen.
I painted a swatch to see if he would like it.  He would rather me paint the chair than reupholster it.  
Hmmm..... This will be interesting.

Tuesday, August 13, 2013

My First Upholstered Wing Chair

I made my first slip cover back in June, and I wasn't really happy with the look of a slipcover.  I really wanted the chair to be reupholstered.  I like the fitted look on furniture.  I knew I had two of these chairs, so I wasn't so nervous about ruining the chair.  However I wanted to use as much of the drop cloth and piping from the slipcover I had made, so that I wasn't putting anymore money into a project I was going to be experimenting with.  As much as I wasn't thrilled with the slipcover, I did like it better than my torn and dirty looking wing chair.
So I spent a day tearing apart my slipcover in hopes that this was not all in vain.  I was able to use almost all the pieces from the slipcover.  I had to recover the wing part by itself and make that two separate pieces at the arm.  I am glad I did the slipcover and had those tips from Miss Mustard Seed's Videos.  I was definitely more relaxed from having that experience.  
I am not going to do a step by step tutorial.  I am just going to show you different pics.  On the left you can see how the wing and the arm are two different pieces.  I just folded the fabric under and stretched and stapled it.
When it came to the back of the chair, I did not have the cardboard thingy that they used.  It was not able to be used again, so I came up with my own template.  I explain it in the photo below.
I did reuse the metal clips the factory had used.  I also reused the hardboard template they had in the arm front.  So sorry for my layman terms.  I am not a professional and have no idea what I am talking about with all of these pieces.  
Here is a pic of the slipcover I did back in June vs. the upholstered chair.  I personally would reupholster before I made a slip cover.  Once you tear things apart and see how it is put together, it really isn't hard.  There is a lot less sewing involved!  I love that part!  I am not even sure if I would have had to sew if my wings were like some of the wing chairs I saw on the videos I watched.  Again I am so thankful for making that slipcover so that I had a clue with what to do with the wing part.
I love it!